Few exercises command as much respect in the weight room as the deadlift. It is a full-body movement that builds raw strength, develops posterior chain power, and trains the kind of functional force that transfers directly to sport and everyday life. Yet for all its benefits, the deadlift is also one of the most commonly butchered lifts — not because it is inherently dangerous, but because its technique demands precision that most beginners skip. This guide walks you through every layer of the movement, from foot placement to lockout, so you can pull heavy and stay injury-free for years.
Why the Deadlift Deserves a Place in Your Training
The deadlift trains more muscle groups simultaneously than almost any other exercise. Your glutes, hamstrings, spinal erectors, lats, traps, rhomboids, core, and forearms all contribute meaningfully to a single rep. That density of stimulus makes it extraordinarily efficient for building total-body strength and muscle mass.
Beyond aesthetics, the deadlift develops the capacity to generate force from the ground up — a skill that underpins athletic performance, injury resilience, and quality of life as you age. It also teaches you to produce and maintain spinal rigidity under load, which carries over to squats, rows, carries, and virtually every compound movement you will ever do.
- Posterior chain development: Glutes and hamstrings are the primary movers; back extensors maintain position throughout.
- Grip strength: Sustained isometric grip demand builds forearm and hand strength that benefits every other lift.
- Hormonal response: Heavy compound loading involving large muscle groups stimulates a robust anabolic hormonal environment.
- Injury resilience: Properly programmed deadlifts strengthen the structures most prone to lower back and hip injury.
Setup: Stance, Bar Position, and Grip
A great deadlift begins before the bar moves. The setup is where most errors originate, so treat it as deliberate and repeatable every single time.
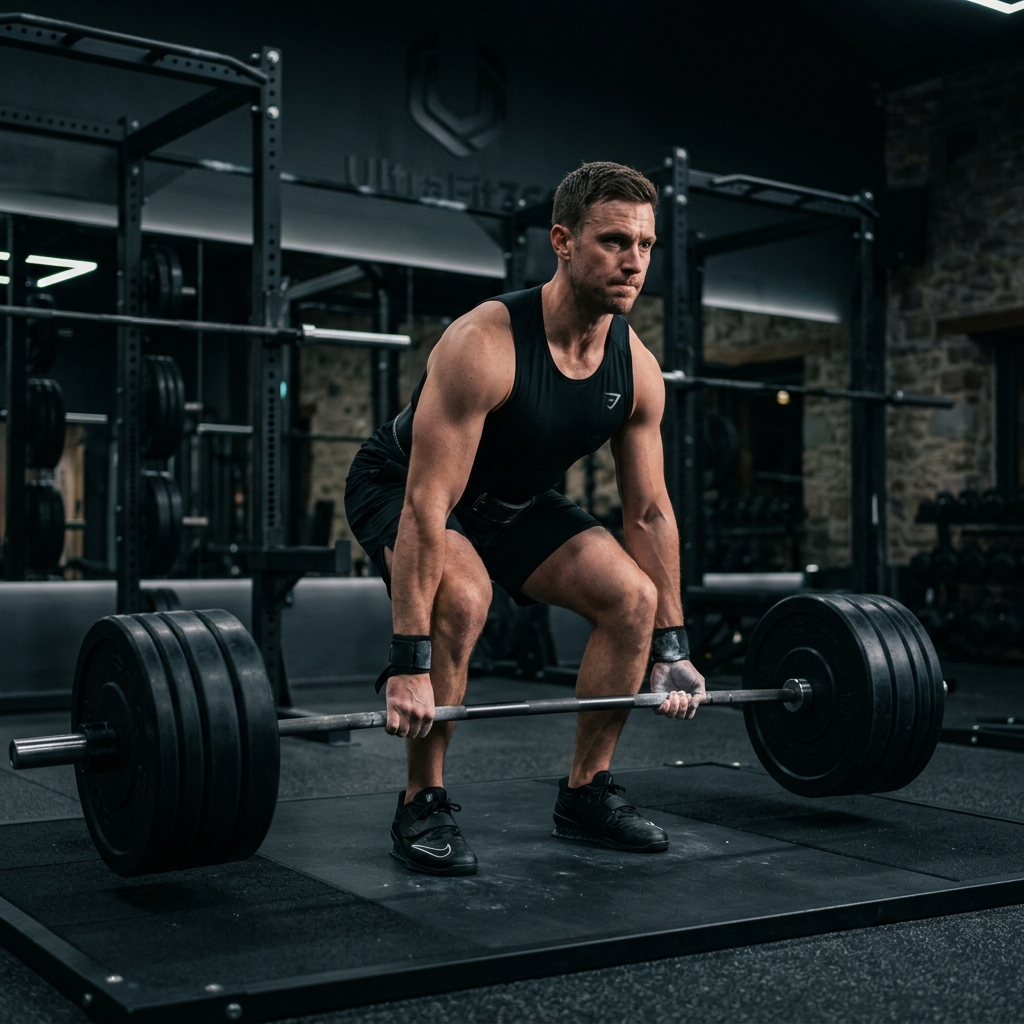
Foot stance: Stand with your feet roughly hip-width apart, toes pointed slightly outward — between 15 and 30 degrees depending on your hip anatomy. Your shins should be close to the bar, approximately one inch away when you are standing upright. Do not crowd the bar, but do not stand back from it either.
Bar position: The bar should track directly over the mid-foot throughout the lift. When you look down at your foot, mid-foot is roughly the point beneath your laces, not the toes. This is your balance point and the bar should stay over it from the floor to lockout.
Hip hinge to the bar: Push your hips back and hinge forward to grip the bar. Do not squat down to it. Your hips will be higher than your knees but lower than your shoulders when you grip — the exact angle depends on your limb proportions, but this hip-higher-than-knees position is non-negotiable for conventional deadlifts.
Grip: Use a double overhand grip while you are learning. Your hands go just outside your legs. Once grip becomes a limiting factor, a mixed grip (one hand pronated, one supinated) or hook grip are options. For now, double overhand with chalk or straps on heavy sets preserves symmetry and builds the grip strength you will need later.
Grip width cue: Arms should be vertical when viewed from the front. If your arms flare outward, your grip is too wide. Narrow it until the arms hang straight down.
The Hip Hinge: Foundation of the Pull
The hip hinge is the movement pattern that makes a deadlift a deadlift. If you cannot hinge cleanly without a bar, you will struggle to do it under load. Practice the pattern first.
Learning the hinge: Stand a foot from a wall. Push your hips back until they touch the wall while keeping your chest tall and a soft bend in the knees. That is a hip hinge. The knees bend only enough to allow the hips to travel back — they are not the primary driver of the movement.
- Hips back, not down: Think "push your hips toward the wall behind you," not "sit into a chair."
- Neutral spine: Maintain the natural curves of your lumbar and thoracic spine. Neither flatten your low back nor exaggerate the arch.
- Weight over mid-foot: As you hinge, your center of mass stays balanced over the mid-foot, not shifting toward the heels or toes.
- Hamstring tension: You should feel a stretch across the hamstrings as you hinge. That tension is what you will use to drive the weight up.
When you apply the hip hinge to the bar, think of pulling the slack out before the bar leaves the ground. Take your grip, set your position, and then create tension through the whole system before you initiate the pull. This removes any jerk from the start and transfers force efficiently from the floor.
Bracing and Breathing: The Valsalva Maneuver
Intra-abdominal pressure is your spine's internal support system during a deadlift. The Valsalva maneuver — a deliberate breath-hold technique — maximizes that pressure and is used by every serious strength athlete on heavy sets.
How to brace: Before you initiate the pull, take a deep breath into your belly — not your chest. Think about expanding your abdomen in all directions: forward, to the sides, and into your lower back. Then hold that breath and contract your entire core as if you were bracing for a punch. Do not let air out during the rep.
Timing: Brace before you pull. The sequence is: set position → take breath → brace → pull slack out → lift. Releasing the breath at the top of the rep between sets is fine for submaximal work. On maximal efforts, some lifters hold the breath for multiple reps, though this is only appropriate for healthy individuals without cardiovascular concerns.
Lat engagement: Alongside the breath brace, actively engage your lats by imagining you are trying to put your shoulder blades in your back pockets. This creates tension through the upper back that prevents the shoulders from rounding forward and keeps the bar close to the body.
The Pull and the Lockout
With setup, hinge, and brace dialed in, the pull itself becomes a matter of applying those fundamentals under load.
Initiation: Drive your feet into the floor rather than thinking about pulling the bar up. Imagine pushing the earth away. This cue shifts focus to leg drive in the early phase of the pull, which is correct — the legs initiate the movement off the floor.
Bar path: The bar should travel in a perfectly vertical line, staying in contact with or grazing the shins on the way up. Any drift forward away from the body is a mechanical disadvantage and increases lumbar stress dramatically. Wear long socks or shin sleeves if bar drag causes discomfort.
Maintaining position: Your torso angle relative to the floor should not change in the first half of the pull. Hips and shoulders rise at the same rate. If your hips shoot up first, you have defaulted to a stiff-leg deadlift, which overloads the lower back.
The lockout: At the top, stand fully tall with hips through, glutes contracted, and shoulders back. Do not hyperextend the lower back to finish — squeeze the glutes and drive the hips forward to lockout. You should be standing straight, not leaning back.
- Cue to finish: "Hips through, chest tall" — not "lean back."
- Shoulder position at lockout: Shoulders directly over or slightly behind the bar, not in front of it.
- Controlled descent: For most training purposes, lower the bar with control by reversing the hinge. Do not dump it. Maintaining tension on the way down builds more muscle and reinforces the hinge pattern.
Conventional vs. Sumo: A Brief Comparison
The conventional deadlift — feet hip-width, hands outside the legs — is the baseline and is covered throughout this guide. The sumo deadlift features a wide stance with toes pointed out significantly and hands gripping inside the legs.
Sumo shifts more demand onto the hips and quads and shortens the range of motion, which suits lifters with longer torsos or limited hip mobility. Conventional tends to be more hamstring and lower back dominant with a longer pull distance. Neither is universally superior — your anatomy, mobility, and training goals determine which variant serves you better. Learn conventional first to build the foundational hip hinge pattern, then experiment with sumo once the basics are solid.
Common Mistakes and How to Fix Them
Understanding what goes wrong is as instructive as knowing what to do right. These are the errors that appear most frequently and the cues that correct them.
- Lower back rounding: Usually caused by insufficient hamstring mobility, a weak brace, or hips set too low in setup. Fix: practice the hip hinge, strengthen the brace, and ensure your hips are high enough that tension is on the hamstrings before you pull.
- Upper back rounding: Caused by weak lats and upper back or bar drifting forward. Fix: engage lats before the pull, keep the bar close, and include heavy rows and lat pulldowns in your program.
- Hips shooting up first: The most common error on the pull. As soon as the lift feels hard, the hips rise to turn it into a back-dominant movement. Fix: consciously maintain your torso angle in the first half of the pull; cue "chest and hips rise together."
- Jerking the bar: Attempting to yank the bar off the floor instead of building tension first. Fix: pull the slack out of the bar before committing to the lift. Feel the plates start to tense against the floor before the bar breaks.
- Bar drifting forward: Causes the load moment arm to increase dramatically, stressing the lower back. Fix: engage lats, keep shins close, and think "drag the bar up my body."
- Hyperextending at lockout: Finishing by leaning backward rather than standing tall. Fix: cue the glute squeeze to drive hips through to neutral, not past it.
Programming Basics for the Deadlift
The deadlift is neurally demanding and recovers more slowly than upper body lifts, so frequency and volume should reflect that reality. Beginners can typically deadlift twice per week and recover well. Intermediate lifters often do better with one heavy session and one lighter technique session per week. Advanced athletes may pull heavy only once every seven to ten days.
A simple entry-level structure: one working set of five reps at a challenging weight after two to three warm-up sets, adding weight each session until progress stalls. This approach, associated with beginner linear progression programs, builds strength rapidly while keeping volume manageable.
As you advance, rep ranges between one and five build maximal strength, sets of four to eight develop strength-hypertrophy, and sets of eight to twelve increase hypertrophy and reinforce technique under fatigue. Accessory work — Romanian deadlifts, single-leg deadlifts, back extensions, and deficit pulls — addresses weaknesses in specific portions of the lift.
Track every session: the weight you used, the reps completed, how the bar moved, and any technique notes. Over weeks and months, that log becomes a roadmap showing exactly where you have improved and where your form breaks down under fatigue. UltraFit360 lets you log each set with form notes and tracks your progression over time, so you always know whether your deadlift is trending in the right direction — and what to focus on next session to keep it moving forward.
Transform Your Fitness Journey
Log your workouts, track your diet, and get AI coaching insights — all with UltraFit360.