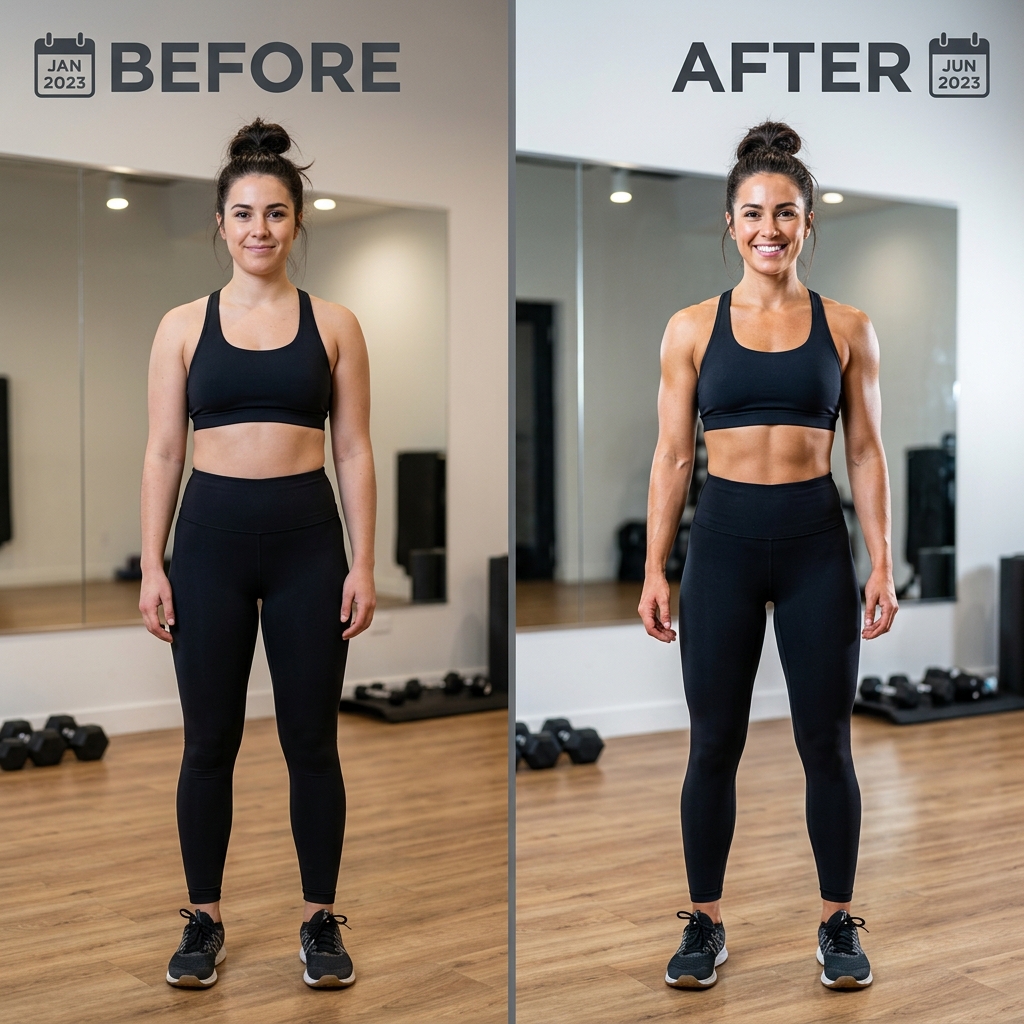
A bad progress photo makes you look worse. A good progress photo makes subtle changes visible. The difference is lighting, angle, pose, and timing — not your actual physique. This guide teaches you how to take progress photos that accurately capture body composition change, so you can see the transformation that metrics alone might miss.
Why Progress Photos Matter More Than the Scale
The scale measures weight; photos reveal body composition change. You can gain 5 pounds of muscle and lose 5 pounds of fat, and the scale stays identical. But a progress photo shows the unmistakable difference in how your physique looks.
Progress photos are powerful because:
- They reveal muscle definition and shape changes the scale can't
- They're visual proof of effort (data that motivates emotionally)
- They show progress when weight plateaus (preventing discouragement)
- They're honest — no excuses, no debate about what changed
The Complete Progress Photo Protocol
Timing: When to Take Photos
Frequency: Every 4 weeks (monthly). Don't take weekly photos — changes are too subtle to see week-to-week, and you'll become discouraged thinking "nothing is happening."
Time of day: Morning, after using the bathroom, before eating (this is when your body is most consistent). Your weight is lowest in the morning; muscle is most "full" before digestion impacts water retention.
Training schedule: Take photos on a rest day or light activity day, never immediately post-workout. Post-workout you're dehydrated and your muscles are pumped (appearance differs from normal state). You want to see your "real" physique, not a temporary state.
Lighting: The Game-Changer
Bad lighting can make you look 10 pounds heavier. Good lighting reveals definition. Here's why: your body has contours and muscle striations. Lighting from the side or above reveals these (makes you look more muscular); flat, frontal lighting obscures them.
Best lighting setup:
- Natural window light from the side: Best option. Sunlight reveals muscle definition naturally
- Bright overhead light (bathroom with large mirror): Second best. Reveals chest and torso definition
- Gym lighting (if consistent): Acceptable if you use the exact same spot every month
- Dark rooms or backlighting: Worst. You'll look flat and undefined
Critical rule: Use the SAME lighting for every photo. Even if you think a new location has better lighting, if it's different from your previous photos, the comparison becomes invalid. Consistency matters more than perfection.
Camera Setup: Phone vs Mirrorless
Phone camera (recommended):
- Easy to use (selfie camera or rear camera with timer)
- Front-facing camera has slight wide-angle distortion (makes you look wider)
- Rear camera is better (less distortion, better quality)
- Use a tripod or prop phone against something to keep it steady
Mirrorless camera (for serious documentation):
- Better image quality (more detail visible)
- Use 50mm lens (no distortion)
- Stand 6-8 feet away from camera (minimizes wide-angle effects)
Distance matters: If you're too close to the camera, the wide-angle lens distorts your body. Stand at least 6 feet away so the camera sees your physique naturally.
The Poses: Front, Side, Back, Relaxed & Flexed
You need multiple angles to capture full-body changes. Take photos in this order:
Front View (Relaxed):
- Arms at sides, naturally relaxed (not flexed)
- Chest out, shoulders back (good posture, not exaggerated)
- Standing straight, feet shoulder-width apart
- Neutral face (serious, not smiling or grimacing)
- Shows: Chest, abs, leg definition
Side View (Relaxed):
- Stand sideways, arm at side (or lightly on torso for balance)
- Good posture (not exaggerated arching of back)
- Face looking straight ahead
- Shows: Ab definition, glute shape, shoulder width
Back View (Relaxed):
- Back to camera, arms at sides
- Slight shoulder engagement (not shrugging, not hanging)
- Head looking at camera (turn head to look over shoulder)
- Shows: Back width, lat definition, hamstring/glute separation
Front View (Flexed):
- Biceps flexed (arm bent, showing muscle), abdominal muscles contracted (slight crunch)
- This pose shows muscle definition more clearly than relaxed
- Shows: Bicep size, ab definition, chest size
Why multiple poses? Lighting and angle dramatically affect appearance. A side view might show ab definition a front view obscures. A flexed pose shows muscle size; relaxed shows true body composition. Comparing side-by-side photos in the same pose over months reveals real change.
Advanced Angles: The 45-Degree and Overhead Shots
45-Degree Angle Shot (Underutilized but Powerful):
- Stand at 45 degrees to camera (not quite side, not quite front)
- This angle reveals chest-to-shoulder balance and oblique definition
- Shows shoulder width combined with arm size (neither alone captures this)
- Ideal for tracking upper body recomposition
Overhead View (For Lower Body Tracking):
- Have camera positioned above looking down at you
- Shows quad definition, glute development, and waist-to-hip ratio clearly
- Reveals asymmetries (one quad more developed than other)
Why these matter: If you only use front/side/back, you miss the best angles for showing specific body part development. Advanced athletes use 5-6 angles to reveal complete transformation.
Clothing: Minimize Variables
Wear the same type of clothing for every photo set:
- Men: Shorts only (or board shorts), no shirt. Shows everything
- Women: Sports bra + shorts, or one-piece swimsuit. Consistent coverage
- Color: Neutral colors (black or gray) so lighting changes don't affect appearance
- Fit: Same fit/style each month (a different pair of shorts can change how you look)
Why this matters: Baggy clothing hides definition; tight clothing exaggerates it. Consistency in clothing ensures the photo differences are from your body, not your outfit.
How to Analyze Your Progress Photos
Step 1: Compare Month 1 to Month 2
Look for these subtle changes:
- Muscle definition: Can you see ab striations more clearly? Shoulder caps more pronounced? These indicate fat loss + muscle preservation
- Muscle size: Do your arms look thicker? Chest more prominent? Check the flexed photo
- Body shape: Is your waist smaller relative to your chest/shoulders? This is recomposition (classic "V-shape" widening)
- Symmetry: Are both sides equal, or is one arm/leg more developed? Identifies imbalances to address
Step 2: Look for Objective Markers
- Ab visibility: Month 1: no abs visible. Month 2: faint 4-pack. Month 3: clear 6-pack. This is objective progress
- Vascularity: More visible veins usually indicate lower body fat
- Skin tightness: Skin looks more "drawn" to muscle (less loose skin) during fat loss
- Chest/shoulder separation: Can you see distinct separation between muscle groups?
Step 3: Track Every 12-16 Weeks
After 4 months of consistent photos (taken monthly), you'll see unmistakable transformation. The before (month 1) vs. after (month 5) comparison is typically dramatic enough to keep you motivated for the next 4 months.
Common Progress Photo Mistakes
Mistake #1: Changing Lighting Month-to-Month
You can look 10 pounds lighter or heavier just by changing where you take the photo. Gym lighting vs home lighting creates false appearance differences. Use the exact same location and lighting every time.
Mistake #2: Flexing in the "Relaxed" Photo
If you flex in month 1's relaxed photo but don't in month 2, you'll look smaller even if you actually gained muscle. Use consistent muscle engagement (relaxed means relaxed; flexed means flexed).
Mistake #3: Extreme Posture Changes
Arching your back exaggerates your chest and ab definition. Slouching hides both. Neutral posture is "good posture but relaxed" — not exaggerated either direction.
Mistake #4: Taking Only Front-View Photos
You miss back development, shoulder width, and oblique/side body definition. Take at least 3 angles: front, side, back.
Mistake #5: Comparing Flexed-to-Relaxed Photos
Flexed photos show more muscle definition; relaxed shows true body composition. Only compare flexed-to-flexed and relaxed-to-relaxed. Cross-comparison is meaningless.
The Psychology of Progress Photos
Progress photos are incredibly motivating because they're objective proof. Metrics like body fat % or weight feel abstract. But a visual before/after hits differently — you can't argue with your own eyes.
Elite athletes look at their progress photos on difficult days when motivation is low. Seeing the transformation you've already created motivates the push for the next phase.
Pro Tips for Perfect Progress Photos
- Use a tripod/timer: Removes the awkwardness of asking someone to take your photo. Consistency in framing matters
- Take 5-10 shots per pose: You might blink, grimace, or move. Having multiple shots ensures a clean final image
- Store photos in a dedicated folder: Organize by date so you can easily review progression (phone Photos app with smart albums works well)
- Make a before/after video: Slide through monthly photos quickly (like a movie). The motion makes changes even more apparent
- Print and frame your transformation: Seeing your progress displayed visually is incredibly motivating
Advanced Photo Analysis: Measuring Change Quantitatively
Beyond visual comparison, serious athletes use photo analysis tools to measure change objectively:
1. Photo Overlay/Morphing Software
- Apps like "Before and After" or "Pic Stitch" let you overlay month 1 and month 5 photos transparently
- You can see exact silhouette changes (shoulder width expansion, waist narrowing, leg development)
- More objective than subjective "looks bigger"
2. Pixel Measurement via Photo Analysis
- Advanced method: Use consistent photo framing to measure bicep size change (pixel width of arm in photo)
- If you stand same distance from camera each month, arm pixel width correlates to actual arm circumference change
- 1-2 pixel width increase = ~0.5 cm arm circumference gain (useful to validate tape measurements)
3. Posture Analysis
- You can measure spinal position, shoulder height balance, and hip positioning in photos
- Straight spine with elevated chest (month 1) vs slouched spine (month 5) shows posture improvement
- Better posture improves appearance 10-15% independently of body composition change
The Psychology of Photo-Based Progress: When Photos Lie
Important caveat: Photos can deceive just like the scale can. Factors that make you look dramatically different WITHOUT body change:
- Pump: Post-workout muscles are 10-20% larger from fluid. After workout = unreliable photo. Before workout = more honest
- Tan: A tan makes muscle definition appear 2-3x more pronounced (doesn't mean more muscle)
- Dehydration: Dehydrated for 12 hours before photo = look 15-20% leaner (temporary effect)
- Shaving: Shaved body looks 3-5% more defined (skin texture change)
- Posture/core flex: Consciously flexing core = 5-10% slimmer appearance (temporary)
The solution: Photos should be taken in a "normal" state (not dehydrated, not post-pump, not fully flexed). Consistency in these variables matters more than optimizing appearance for one photo.
Research on Photo-Based Progress Tracking
Studies validating photo-based assessment:
- Kasper et al. (2009): Journal of Sports Sciences found trained observers can assess body composition change from progress photos with 90%+ accuracy when photos are taken consistently
- Neate et al. (2015): Validated that monthly progress photos correlate strongly (r=0.89) with DEXA body composition measurements when lighting/angle are controlled
Translation: Photos are scientifically valid for tracking progress if done consistently. They're not just for motivation — they're legitimate measurement tools.